Pika Labs just came out with a brand new tool that allows you to automatically add synced lips to your video.
This feature is really helpful for adding synced lips to animation projects. In this article, we dive into the functionality, utility, and practical application of Pika Labs’ Lip Sync Feature.
What is Pika Labs Sync Feature?
Pika Labs’ Lip Sync is a tool that automatically matches lip movements in your videos with the audio you provide. It simplifies the process to add realistic lip syncing to animations and videos, improving their quality and making them look more natural.
How to use Lip Sync Feature in Pika Labs?
Step 1: Accessing Pika Labs
Go to pika.art and sign in Google or Discord. Prepare your video or image that you want to add lip sync movements to.

Step 2: Asset Selection
Depending on your project requirements, choose between importing an image or a video. While images have a limitation of syncing only three seconds of footage, videos offer greater flexibility in duration.

Step 3: Uploading
Once you’ve selected your asset, proceed to upload it to the Pika Labs interface. For optimal results, it’s advisable to use videos for extended sequences.
Step 4: Select Lip Sync Audio
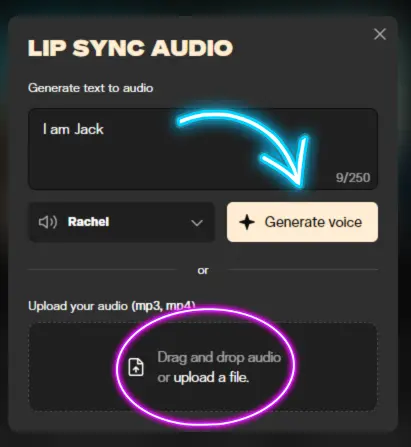
Inside Lip Sync Audio feature you can generate the audio from text in Pika 1.0 platform. Select the voice from dropdown menu. Alternatively, you can upload the desired audio file to accompany your video. Pika Labs provides a range of voices sourced from ElevenLabs, allowing users to tailor the audio to their preferences.

Step 5: Generation
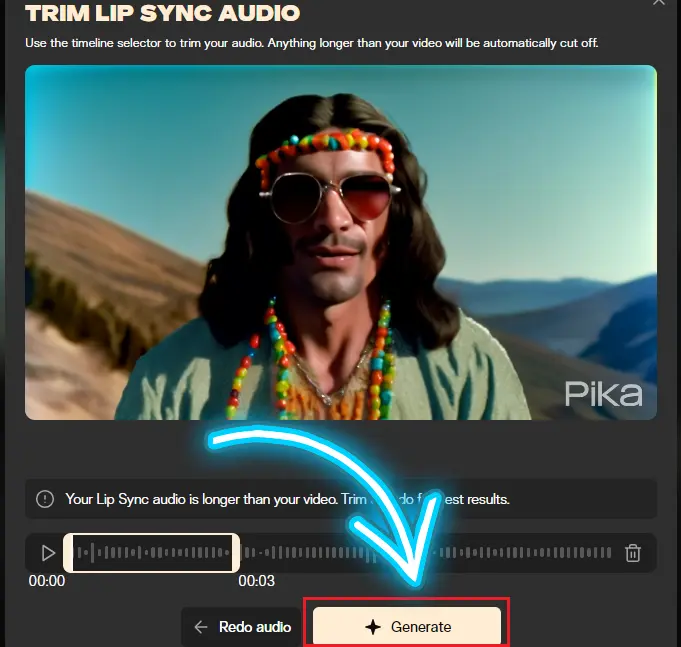
Click on the “Attach and Continue” button to initiate the lip sync generation process. You can generate up to 3 seconds video only.

Final Results
So, the generation is done. Took about a minute to render.
Let’s take a look at what we have.
Before Using Pika Lip Sync
After Using Pika Lip Sync
So, there you go. As you can see, it did a really good job with the lips on this specific instance.
And I think that this really illustrates that Pika is really good at doing 3D animation Style.
I want to show you another really quick example here. So, I have this image that I created inside of mid-Journey. It’s like in the 3D animation style. I think it looks really interesting.
Other Lip Sync Alternatives:
You typically had to utilize other tools like Wav2Lip, where you would take the video and drop it into Wave2Lip and Sadtalker.
It exports from a Hugging Face website, where the quality is notably low. Subsequently, you must run it through an AI enhancement tool such as Topaz Video, utilizing the Iris model to achieve maximum quality.
FAQs:
1. How do I use Pika Labs’ Lip Sync Feature?
To use the Lip Sync Feature, follow these steps:
- Upload your image or video to the Pika Labs platform.
- Select or upload the audio file you want to sync with the video.
- Click the “Generate” button to start the lip sync process.
- Review the synchronized video to ensure it meets your quality standards.
2. What are the limitations of Pika Labs’ Lip Sync Feature?
While Pika Labs’ Lip Sync Feature is highly effective, it does have some limitations:
- It works best with front-facing subjects and may struggle with angled shots.
- For images, it can only sync up to three seconds of footage.
- Complex camera movements and dynamic environments may affect the accuracy of the lip sync.
3. Can I use Pika Labs’ Lip Sync Feature with different animation styles?
Yes, Pika Labs’ Lip Sync Feature works with various animation styles, including 3D animation and photorealistic visuals. It is particularly effective with 3D animation, ensuring the lip movements are well-synced with the audio.
4. How can I enhance the quality of my lip-synced videos?
To enhance the quality of your lip-synced videos, you can use an AI enhancement tool like Topaz Video. This tool allows you to:
- Increase the resolution of your video (e.g., to Full HD or 4K).
- Select the appropriate AI model (e.g., the Iris model for better facial detail).
- Adjust settings to maximize video quality, depending on your computer’s processing power and the specific requirements of your project.

Hi this is so cool and beautiful ❤️